Learn how to transform ordinary screens around your library into digital signs, and create up to date content to display. Pull live data onto your signs using widgets, and manage everything remotely, via the Control Panel.
Learn how to create shows, set up screens and program your channels.
Create a show
6 mins, 12 secs
Learn how to easily create and animate content for your digital signs using our intuitive show builder. Find out how to use templates, and make the most of advanced options, including Smart Shows and Nested Shows.![]()
Set up screens and channels
5 mins, 32 secs
Learn how to transform almost any device with internet access and a screen into a digital sign, and schedule shows to display. ![]()
Learn the basics of Broadcast with step by step illustrated guides.
Use Broadcast to build and schedule content, and display it on screens and monitors.
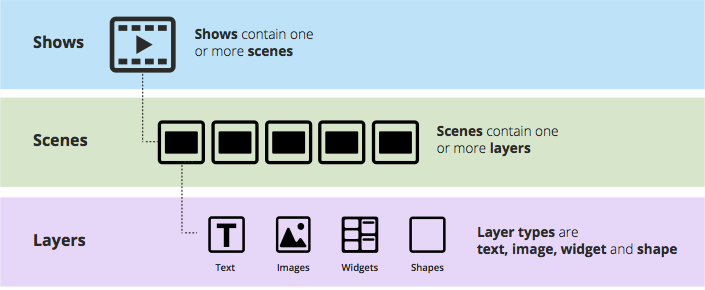
Broadcast is made up of shows that are scheduled to play via channels on your screens.
Shows are built up of individual scenes which themselves are built up of layers of images, text, shapes and widgets. These layers can all be separately animated, like in a slideshow presentation.


Once you have created a show, you can add it to a channel. You can fill a channel with one show or schedule different shows to play at different times.
These channels will then play on any screens to which they are assigned. To set up a screen, you'll first need to register it with Communico, then set it up with a channel to play.
Your content needs to be first pulled into shows, so that it can then be scheduled into channels, and displayed on screens.
A show will be built up of one or more scenes which will play one after another. The scenes themselves are built up of one or more layers. Each layer will be a text box, an image, a widget or a shape.
Navigate to the Broadcast section of the Control Panel, and select Shows.
Select New show then New show.
Give the show and name and an optional description, which will help you to identify your show later.
Use the dropdown on the right to adjust the aspect ratio to match the screen(s) that this show is intended to be displayed on. Notice how the scene area changes shape. This will ensure that the show you design fits neatly on your display screen, and looks as it should.

To add a brand new scene to your show, click New scene and select Empty Scene.
(If you have templates available, you can select one to start from, rather than starting with an empty scene. Learn about scene templates here.)

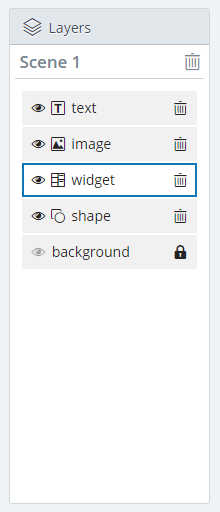
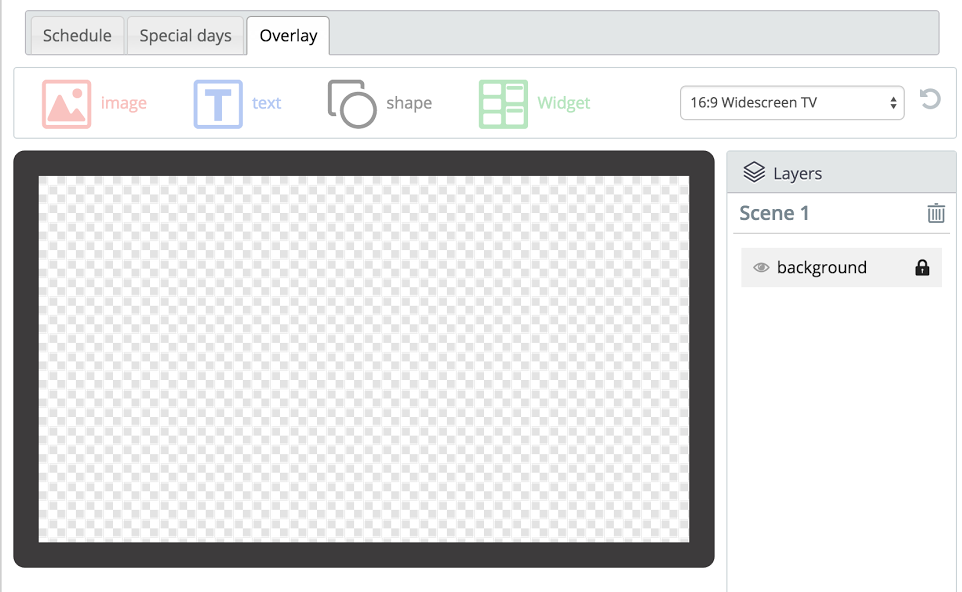
Add content to the scene, including images, text, shapes and widgets, by simply dragging the relevant icon onto the scene area from above. Each new element you drag in creates a new layer in the scene.
![]()
Layers can be quickly repositioned by clicking and dragging the header strip, and resized by dragging the edges.
In the layers palette, on the right, you can see each of your layers. Click and drag to reorder the list and change the layer order in the scene itself. Use the eye icon to focus on an individual layer, or the trashcan icon to delete it. Double click on a layer to open up the layer properties, where you can update settings and animations.
Drag the text icon onto a scene to create a text layer, then click into the text box that is created to open up the text editor. Add your text, and then style it up using the editor.
You'll find more detail about the text editor in the Text Editor guide.

Drag the image icon onto a scene to create an image layer, then you will need to select or upload the image to use.
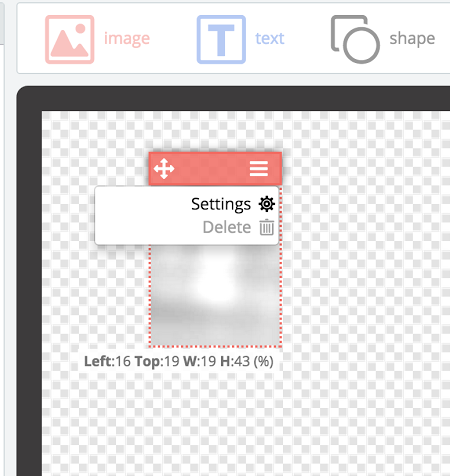
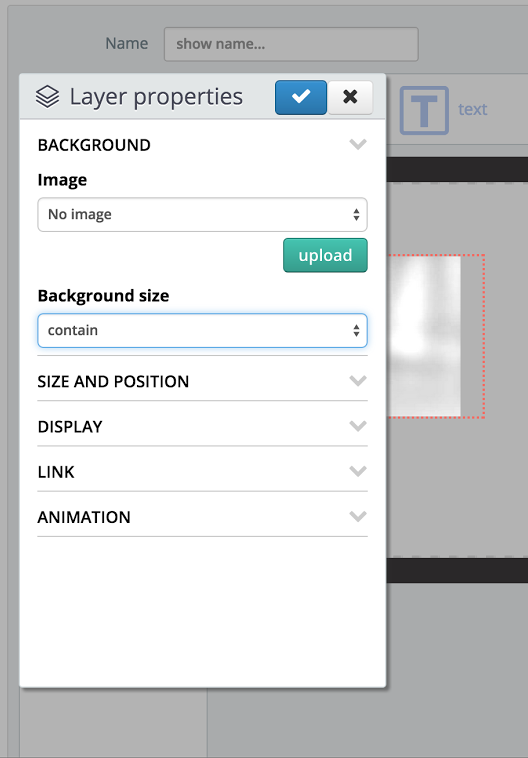
Hover over the element to reveal the header strip, click the menu icon, then select Settings. Open up the BACKGROUND tab, then under Image, either choose an existing image from the dropdown, or click upload to browse your computer and upload a new image.
Note: The quality of images is determined by their resolution. If you want to display full screen images on a large HD monitor or TV, make sure the images are high enough resolution or they will appear blurry or pixelated. Common HD display resolutions are 1280x720, 1366x768 and 1920x1080, so you'll need your images to be this size in pixels and 72dpi to make sure they are crisp at full screen size. Please also ensure you have the rights to use any images you upload.
Under Background size, you can determine how the image will fit in the area you've chosen.
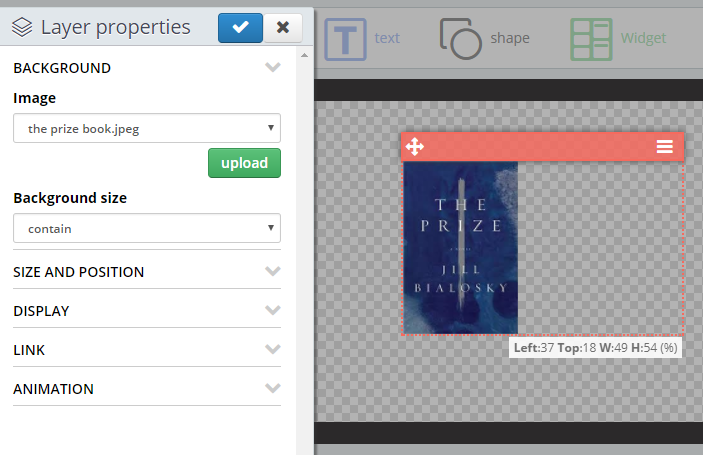
Contain - the image's proportions will be preserved, and it will be fully contained within the chosen area. If the aspect ratio is different between the image and the area, there will be space next to the image.
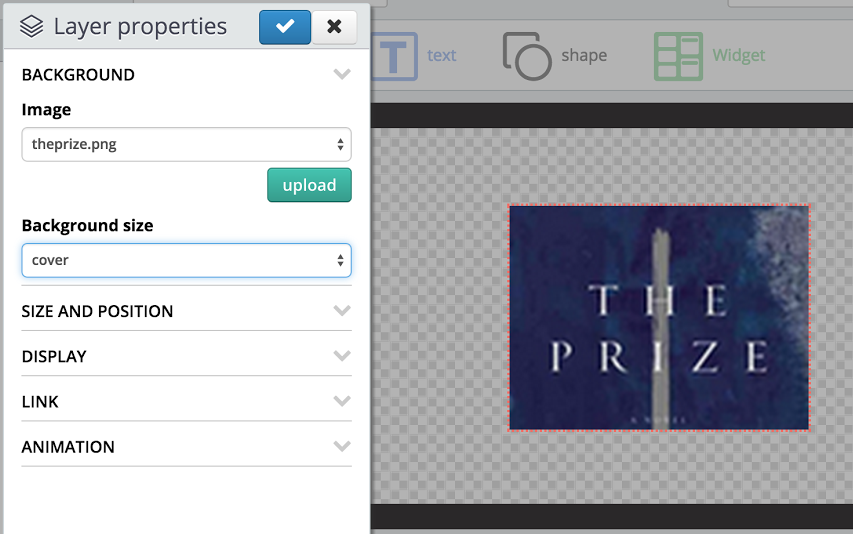
Cover - the image's proportions will be preserved, and it will fully cover the chosen area. If the aspect ratio is different between the image and the area, part of the image will be cut off.
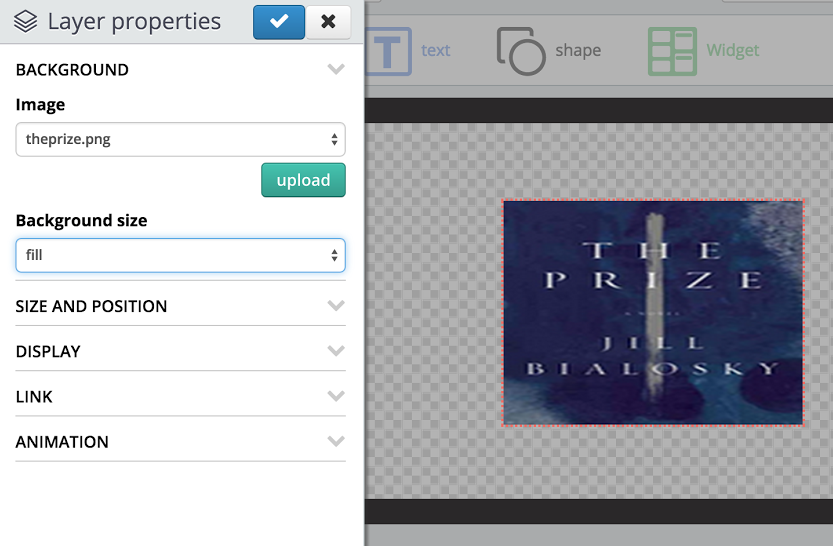
Fill - the image will stretch or compress to exactly fill the chosen area, and proportions will not be preserved. If the aspect ratio is different between the image and the area, the image will be distorted.
Drag the shape icon onto a scene to create a shape layer, then you can adjust the properties such as adding backgrounds and borders, adjusting transparency, or adding animations. Hover over the element to reveal the header strip, click the menu icon, then select Settings to adjust the layer's properties.

Drag the widget icon onto a scene to create a widget layer, then you will need to select a widget to display.
Hover over the element to reveal the header strip, click the menu icon, then select Settings.
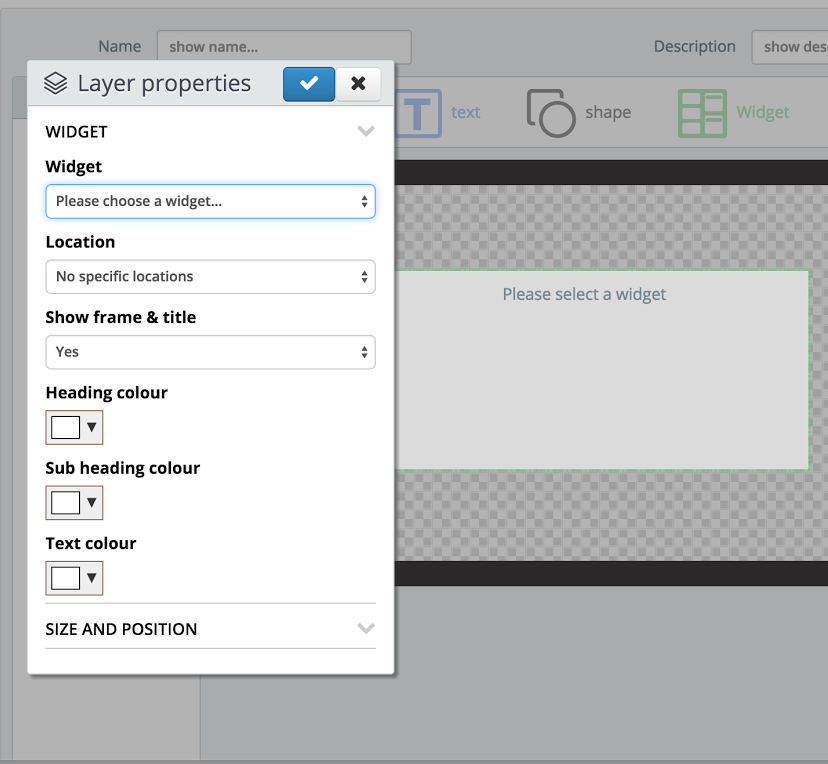
Open up the WIDGET tab, and under Widget, choose one of your widgets from the dropdown. At this stage, the widget is displayed as a gray box on your scene and will contain a preview button, where available, so you can see how the widget will look.
Under Location, you can pick from your dropdown of branch locations if you are using location-aware widgets.
You can also choose whether or not to show the frame and title of the widget - you may feel it looks cleaner without the frame.
In the bottom right corner, below the scene area, you'll find the Preview scene button. Click this at any time to preview this scene, including any animations etc.
To access the layer properties of an element, hover over it to reveal the header strip, click the menu icon, then select Settings. Alternatively, go to the layer palette on the right, and double click on one of the layers to open up the settings.
As you change settings, the element will update on the scene, so you can preview your changes in real time.
With these settings, you can make styling changes to the layer, including adding borders, background colors, shadows and spacing.
You'll find more details about many of these standard settings in the Page Builder guide.
In addition to the standard styling settings, you'll also find the Animation tab, where you can individually animate this layer. You can choose a transition style, and set the duration for transitions, total display time for the layer, and set any delays before you want this layer to appear.
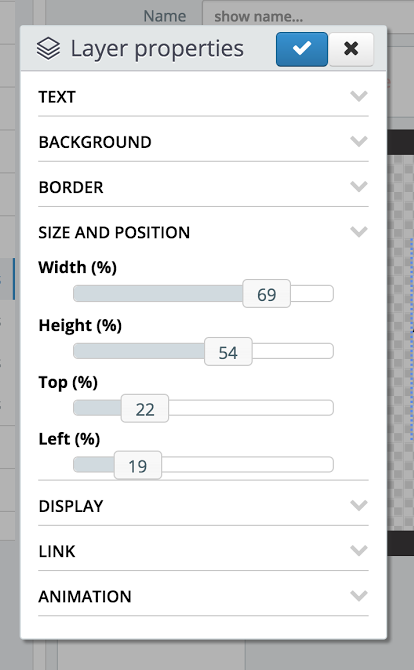
You can also precisely adjust the size and positioning of the element from here, as an alternative to simply dragging and dropping it around the scene area.
Layers are positioned based on a 100% x 100% grid, rather than set by number of pixels. This allows your content to adapt to different sized screens without having to create individual shows for each size.
Use the sliders to determine where the element will sit on the scene area (how far from the top and left the edges will lie), and how much space it will occupy (its height and width).
For example, to create a full page element, use the following settings: top 0%, left 0%, width 100%, height 100%
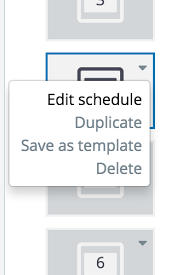
Edit schedule - this will open a pop up window where you can individually schedule this scene to appear and disappear at a certain date and time. This can be useful for holidays, closures or special library events, and can be used instead of, or in conjunction with Special Day scheduling within your channels.
Duplicate - this will duplicate the selected scene and create a new identical one, which you can add to and amend as usual.
Save as template - this will add this scene to your list of templates, so that it can then be used again within this show and others.
Delete - this will delete this scene.
When you create a new scene by clicking New scene, you will be presented with the option to either start with an empty scene, or a template.
If you select template, you will see a dropdown list of all your existing templates, and can select one to add to your show by clicking it. Once it's added, you can add to it and make amendments like any other scene.
Templates can be created separately, or can be saved from another scene in your show. Templates can then be used across any of your shows, as many times as you like. It may be useful to create some basic templates for popular scene layouts, for example a full screen image, a full screen widget, or a text box alongside an image.
To create a new template, navigate to Broadcast, then Templates. Here you'll find a list of all your existing templates. Click New show template and give it a name and optional description.
Build up the scene as you would a normal scene, by dragging and dropping in elements from above, and making changes to their Settings.
Click Save

Even with LED screens, if an image, text or shape is in the same place and the screen doesn’t refresh, there is a chance that that the shape will be ‘burned’ into the screen.
Be careful using a templated scene for all your shows as screens can be ‘burned’ during a relatively short period of time.
Just a single change of scene where the pixels are refreshed will stop this happening.
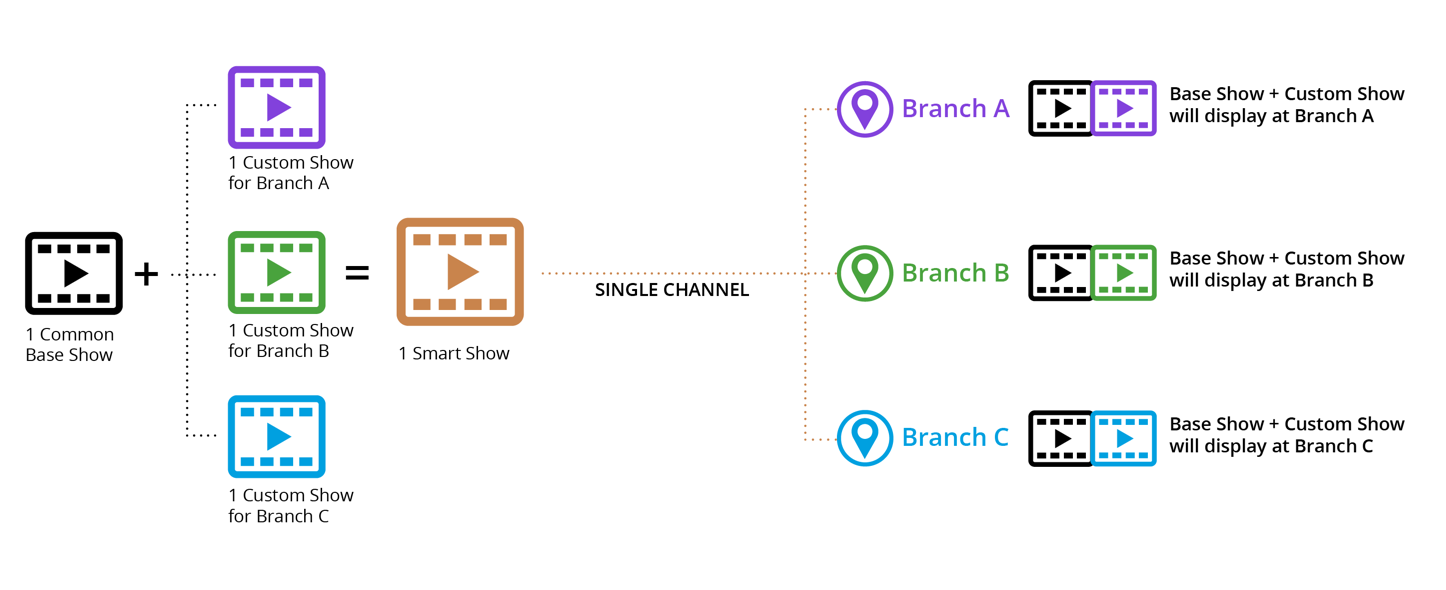
A smart show is an advanced option when creating a show. It allows custom content to display at different branches, using a single channel.
It is made up of a base show (which will display at all locations) and additional custom shows, which are each assigned a specific location (and will only play at that location).
When to use? Use when you need content to be customized for individual locations, but a location specific widget isn't appropriate. Just schedule the smart show to play, and it will play the base show, along with the appropriate custom content.
Navigate to the Broadcast section of the control panel, and select Shows.
Select New show and select New smart show.
Enter a title and optional description. Select your base show from the dropdown list of your existing shows.
Choose the branches which will have their own custom shows by selecting them from the dropdown of all your locations.
Next to each branch, choose the custom show to play at that branch from the dropdown list of your existing shows.
Click Save

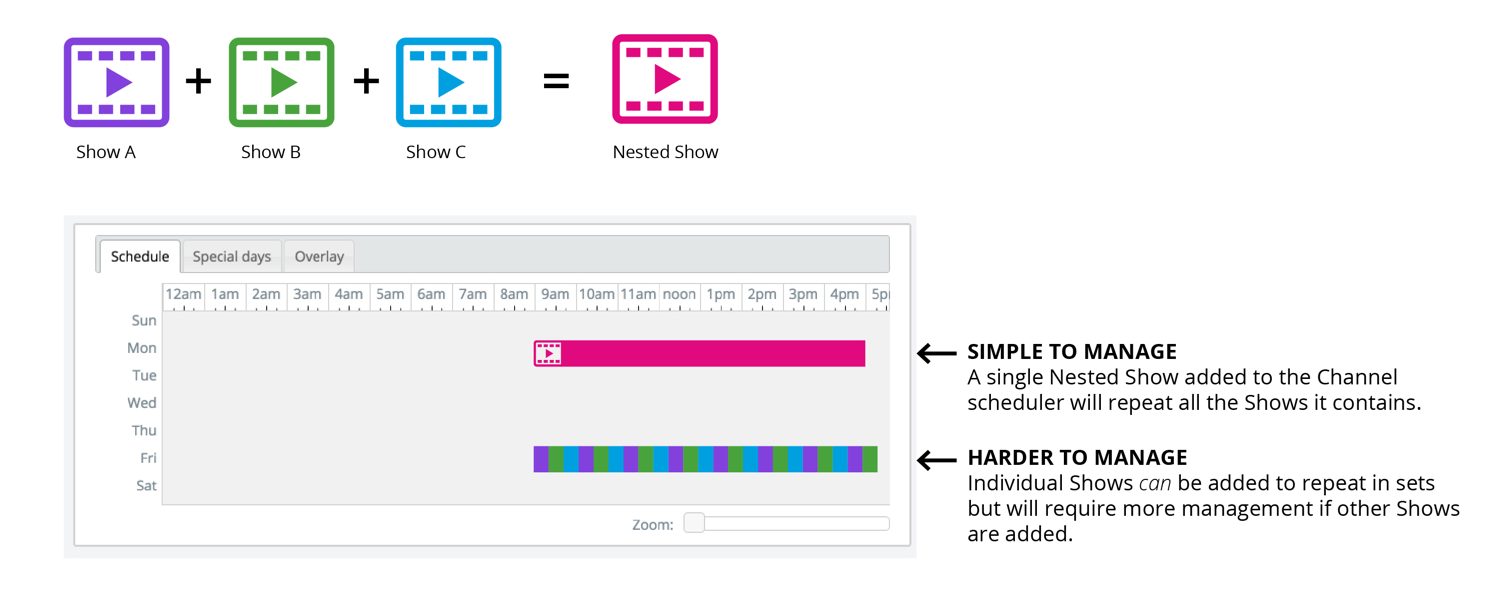
A nested show is an advanced option when creating a show. It allows multiple other shows to be grouped together, so that they'll play in sequence when added to a channel.
It is made up of any number of individual shows arranged into a sequence.
When to use? Use when you want to play several different shows on repeat on a channel, without needing to schedule them each individually.
Navigate to the Broadcast section of the Control Panel, and select Shows.
Select New show and select New nested show.
Enter a title and an optional description.
Use the dropdown to view all your existing shows, and pick the first one you would like to include. Click Add and the selected show will be added to the nested show.
Continue selecting shows from the dropdown and adding them. You can add as many as you need.
Once added, you can rearrange the shows' order by dragging and dropping, or you can delete individual shows using the trashcan button.
Click Save

Channels are used to broadcast your shows to different branches, areas and audiences.
You may have individual channels dedicated to individual screens, or you may use the same channel across multiple screens at a particular location, or in a particular type of area. For example, you could create a 'Teens' channel and display dedicated content across any teen areas throughout all your branches.
You can always include branch specific content as well, by using branch-aware widgets or Smart Shows.
A unique URL is generated for each channel. Enter the URL in any browser and your channel will display, it's as simple as that! You can use this URL to get a live preview of your channel at any time. Under Broadcast, then Channels, find your channel in the listing. Under the URL column, click generate and your URL will appear in a popup.
When you set up a new screen to serve as a digital sign, it will appear in the Screens section of the Control Panel, where you can assign a channel to it, or change the channel - think of it like switching TV stations. Learn about setting up Screens here.

First, you'll need to create your shows. Then, you will create a channel, which will involve building up a repeatingly weekly schedule of standard, Smart and/or Nested shows to play on that channel. Any exceptions to that weekly programming can be separately scheduled as a 'Special Day'.
Navigate to the Broadcast section of the control panel, and select Channels.
Select New channel
Enter a name and an optional description, and select the theme to apply to the shows on this channel.
Next, schedule your weekly programming on that channel, by dragging and dropping shows onto the scheduler.
Note: You will have needed to have first created at least one show in order to be able to schedule a channel.
On the left, you'll see a full list of all of your standard, Smart and Nested shows. These shows can all be used as many times as needed, across as many channels as needed.
To select a show, click the icon next to the show title, and drag it over to the scheduler. Drop it at the appropriate position on the scheduler. Click and drag the ends of the scheduled show to determine the time it will begin and end. Between those times, the show will loop.

Note: To play several shows in sequence, use a Nested Show, rather than trying to schedule shows in a repeating pattern. Learn about nested shows here.
To help get your timings precise, you can use the zoom tool to zoom right in on the end of your scheduled show, and get finer control on your adjustments.
Continue to plan out your week, as needed, by dragging and dropping more shows, and adjusting their durations in the same way.
Click Save

The standard schedule runs on a weekly basis, meaning that a channel will show the same programming every Monday, every Tuesday, and so on. You can override this normal schedule using special days programming. This may be useful around holidays, closures, or when there are special events going on at the library.
First, make sure you have created the show(s) you need to display your special content.
Select the special days tab, click add exception day and select the special day's date from the calendar picker.
A scheduler bar will appear for that day, which you can then program in the normal way, by dragging and dropping the appropriate show icon onto the scheduler, and adjusting the duration.
You can repeat this process to create as many exception days as you need for this channel. On those selected days, the special schedules will play instead of the regular weekly programming.
Click Save

Note: Remember you can also schedule individual scenes to appear and disappear within shows at a certain date and time. This may be used as an alternative to setting special days, or the two features can be used together. Learn about scheduling individual scenes within shows here.
Here, you can choose to overlay all scenes of all shows on this channel with a single scene. This is useful if you want to quickly push out an emergency message, or you wanted to overlay the entire channel with a semi transparent logo or some library branding or information.
Select the Overlay tab, and add any elements to the scene in the same way you would build up a scene in a show.
Click Save
For the first part of the process, you will need contact with the screen itself.
Bring up a broswer on your screen device, and visit communico.tv. (Your screen will then need to be set to communico.tv in order for the digital signage to display, once the screen has been registered and set up.)
Before registration, the communico.tv page will look like this, with the message 'Screen not registered' and a unique 4 digit code:
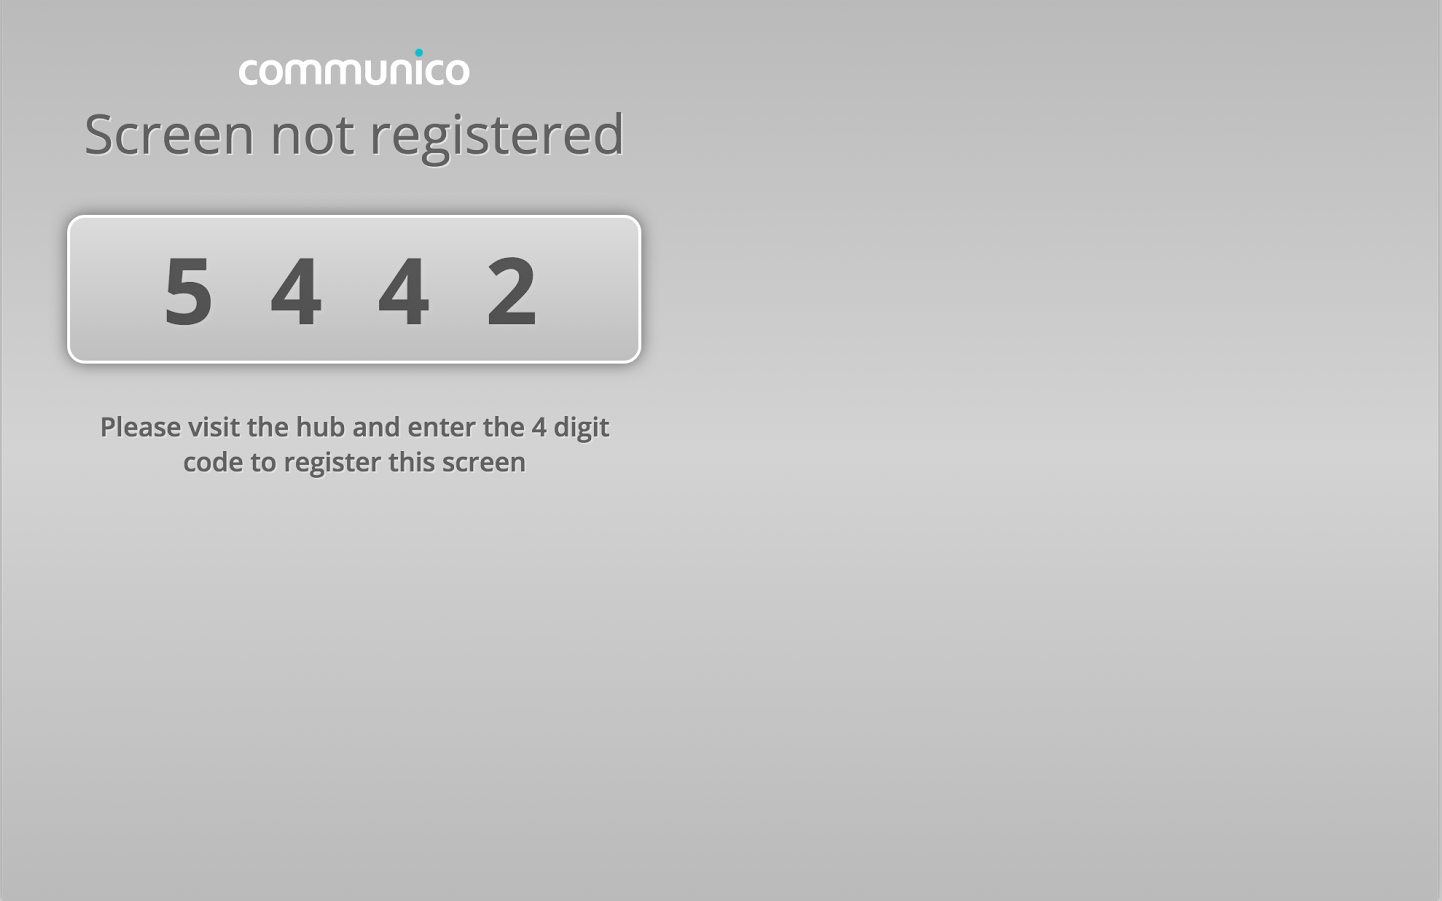
Note: Make a note of this 4 digit number! You will need it for the next part of the process. The code is unique to this screen, and each screen you register will use a different code.
The rest of the screen registration process is done through the Control Panel, so can be conducted from any device, at any location, as long as you have your 4 digit code with you.
Navigate to Broadcast, then Screens, and click Register new screen
Enter your 4 digit code into the screen registration pop up, and enter a useful name for this screen, so that it's easy to identify and maintain later.
Note: Use a unique name for each of your screens so that you can easily identify them from one another. This name will not be seen publicly - it's just to identify the screen within the Control Panel.
Confirm by checking the blue tick, and your screen will be linked to Communico, and added to your screen list.

You will first need to have created your shows, added them to your channels, and registered your screen.
Navigate to Broadcast, then Screens, and find your registered screen in the list.
Use the Channel dropdown to select the channel to display on this screen. This can be changed any time. If you want to view a channel in detail, you can click the clock icon to jump to the Channels section, and view or edit that channel.
Use the Location dropdown to select the location where this particular screen is found, enabling location specific content to display accurately.
Note: These changes will all be live and instant, and the assigned channel will now be broadcast on your screen, as long as that screen is set to communico.tv.
In the Status column, if your screen is on and connected, it will show as online. This does not necessarily mean that a show is currently broadcasting, as that will depend on the schedule of the assigned channel. There is also a reset button, so you are able to manually reset the screen from within the Control Panel if it should ever be needed.


